Master the N8N Http Request Node for One-Click AI Blog Publishing to Shopify
.jpg)
Watch Video Tutorial
In this installment, we dive into one of the most crucial nodes in N8N automation: the Http Request node. Paired with the Webhook node, they form the "Twin Stars of Interconnectivity."
Without exaggeration, once you master these two nodes, you've already learned 80% of what N8N has to offer.
1. Business Scenario: From Tedious to One-Click Publishing
Let's start with a typical business scenario.
A store owner named Alex is great at running a pet blog. His standard operating procedure (SOP) used to look like this:
🤔 The Old, Tedious Workflow:
- Find keywords or a topic.
- Search for reference articles.
- Use AI to write, rewrite, or translate content.
- Use AI to generate accompanying images.
- Log into the Shopify backend and copy-paste the content.
- Manually format and edit the post.
- Hit publish.
Today, after learning a few tricks, Alex has become incredibly efficient. The entire process has been radically simplified:
🚀 The New, Automated Workflow:
- Find a topic.
- Find a reference article.
- Trigger the N8N workflow with a single click (AI handles all the heavy lifting in the background).
- The post is live and ready in the Shopify backend.
This leap in efficiency is all thanks to the Http Request node.
2. Core Concept: What is an Http Request?
Last time, we discussed that the Webhook's main job is to "listen"—acting like a guard that receives automated trigger signals from the outside world.
Once N8N receives a signal, it starts executing the tasks we've configured. This brings up a key question:
Once the work is done, how is it delivered? And to where?
In our current scenario, we want N8N to directly deliver the finished content to the Shopify blog editor. This "delivery" action is called an Http Request—the act of sending a signal containing data to a target server.
This leads to another question: How do we ensure the target server can correctly receive and understand the signal we're sending?
Think of it like real-world communication:
- To call someone, you need their phone number.
- To connect online, you need their social media handle.
- To send them money, you need their bank account number.
In the world of code, transmitting data also requires a standard protocol. This introduces a new concept: the API (Application Programming Interface).
Our target (in this case, Shopify) defines a standard set of API protocols. As developers (or in our case, automators), we just need to follow these API standards and send a request via Http Request to perform operations directly, bypassing the front-end interface.
💡 Simple Analogy: Every button a user clicks on the front-end is, behind the scenes, executing an API call.
So, our task is twofold:
- Find and enable the API endpoint for our own Shopify store.
- Configure N8N's
Http Requestnode to send data according to the API protocol.
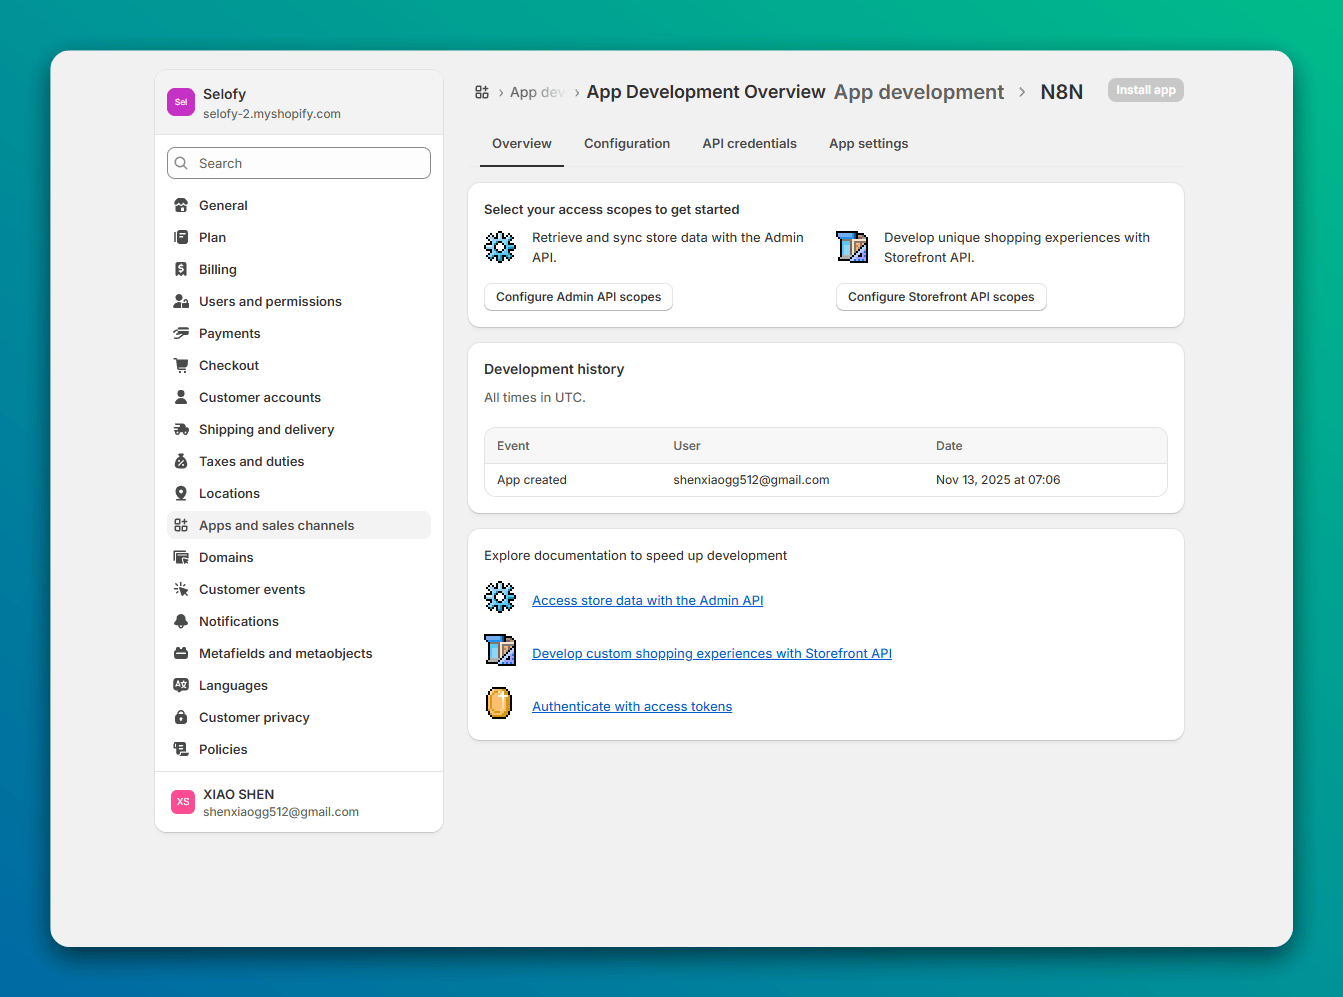
3. Preparation: Enabling Your Shopify API Endpoint
In most SaaS platforms, enabling API access is done by creating a custom "App," and Shopify is no exception.
Here's the step-by-step process:
- Go to your Shopify admin
Settings. - Navigate to
Apps and sales channels. - Click on
Develop apps. - Choose
Create an app, give it any name you like. - Configure Admin API access permissions: Since this is for your own use, feel free to boldly grant all the permissions you might need. This will unlock more automation possibilities for you down the line.
- Save and securely store your API credentials (the access token starting with
shpat_).
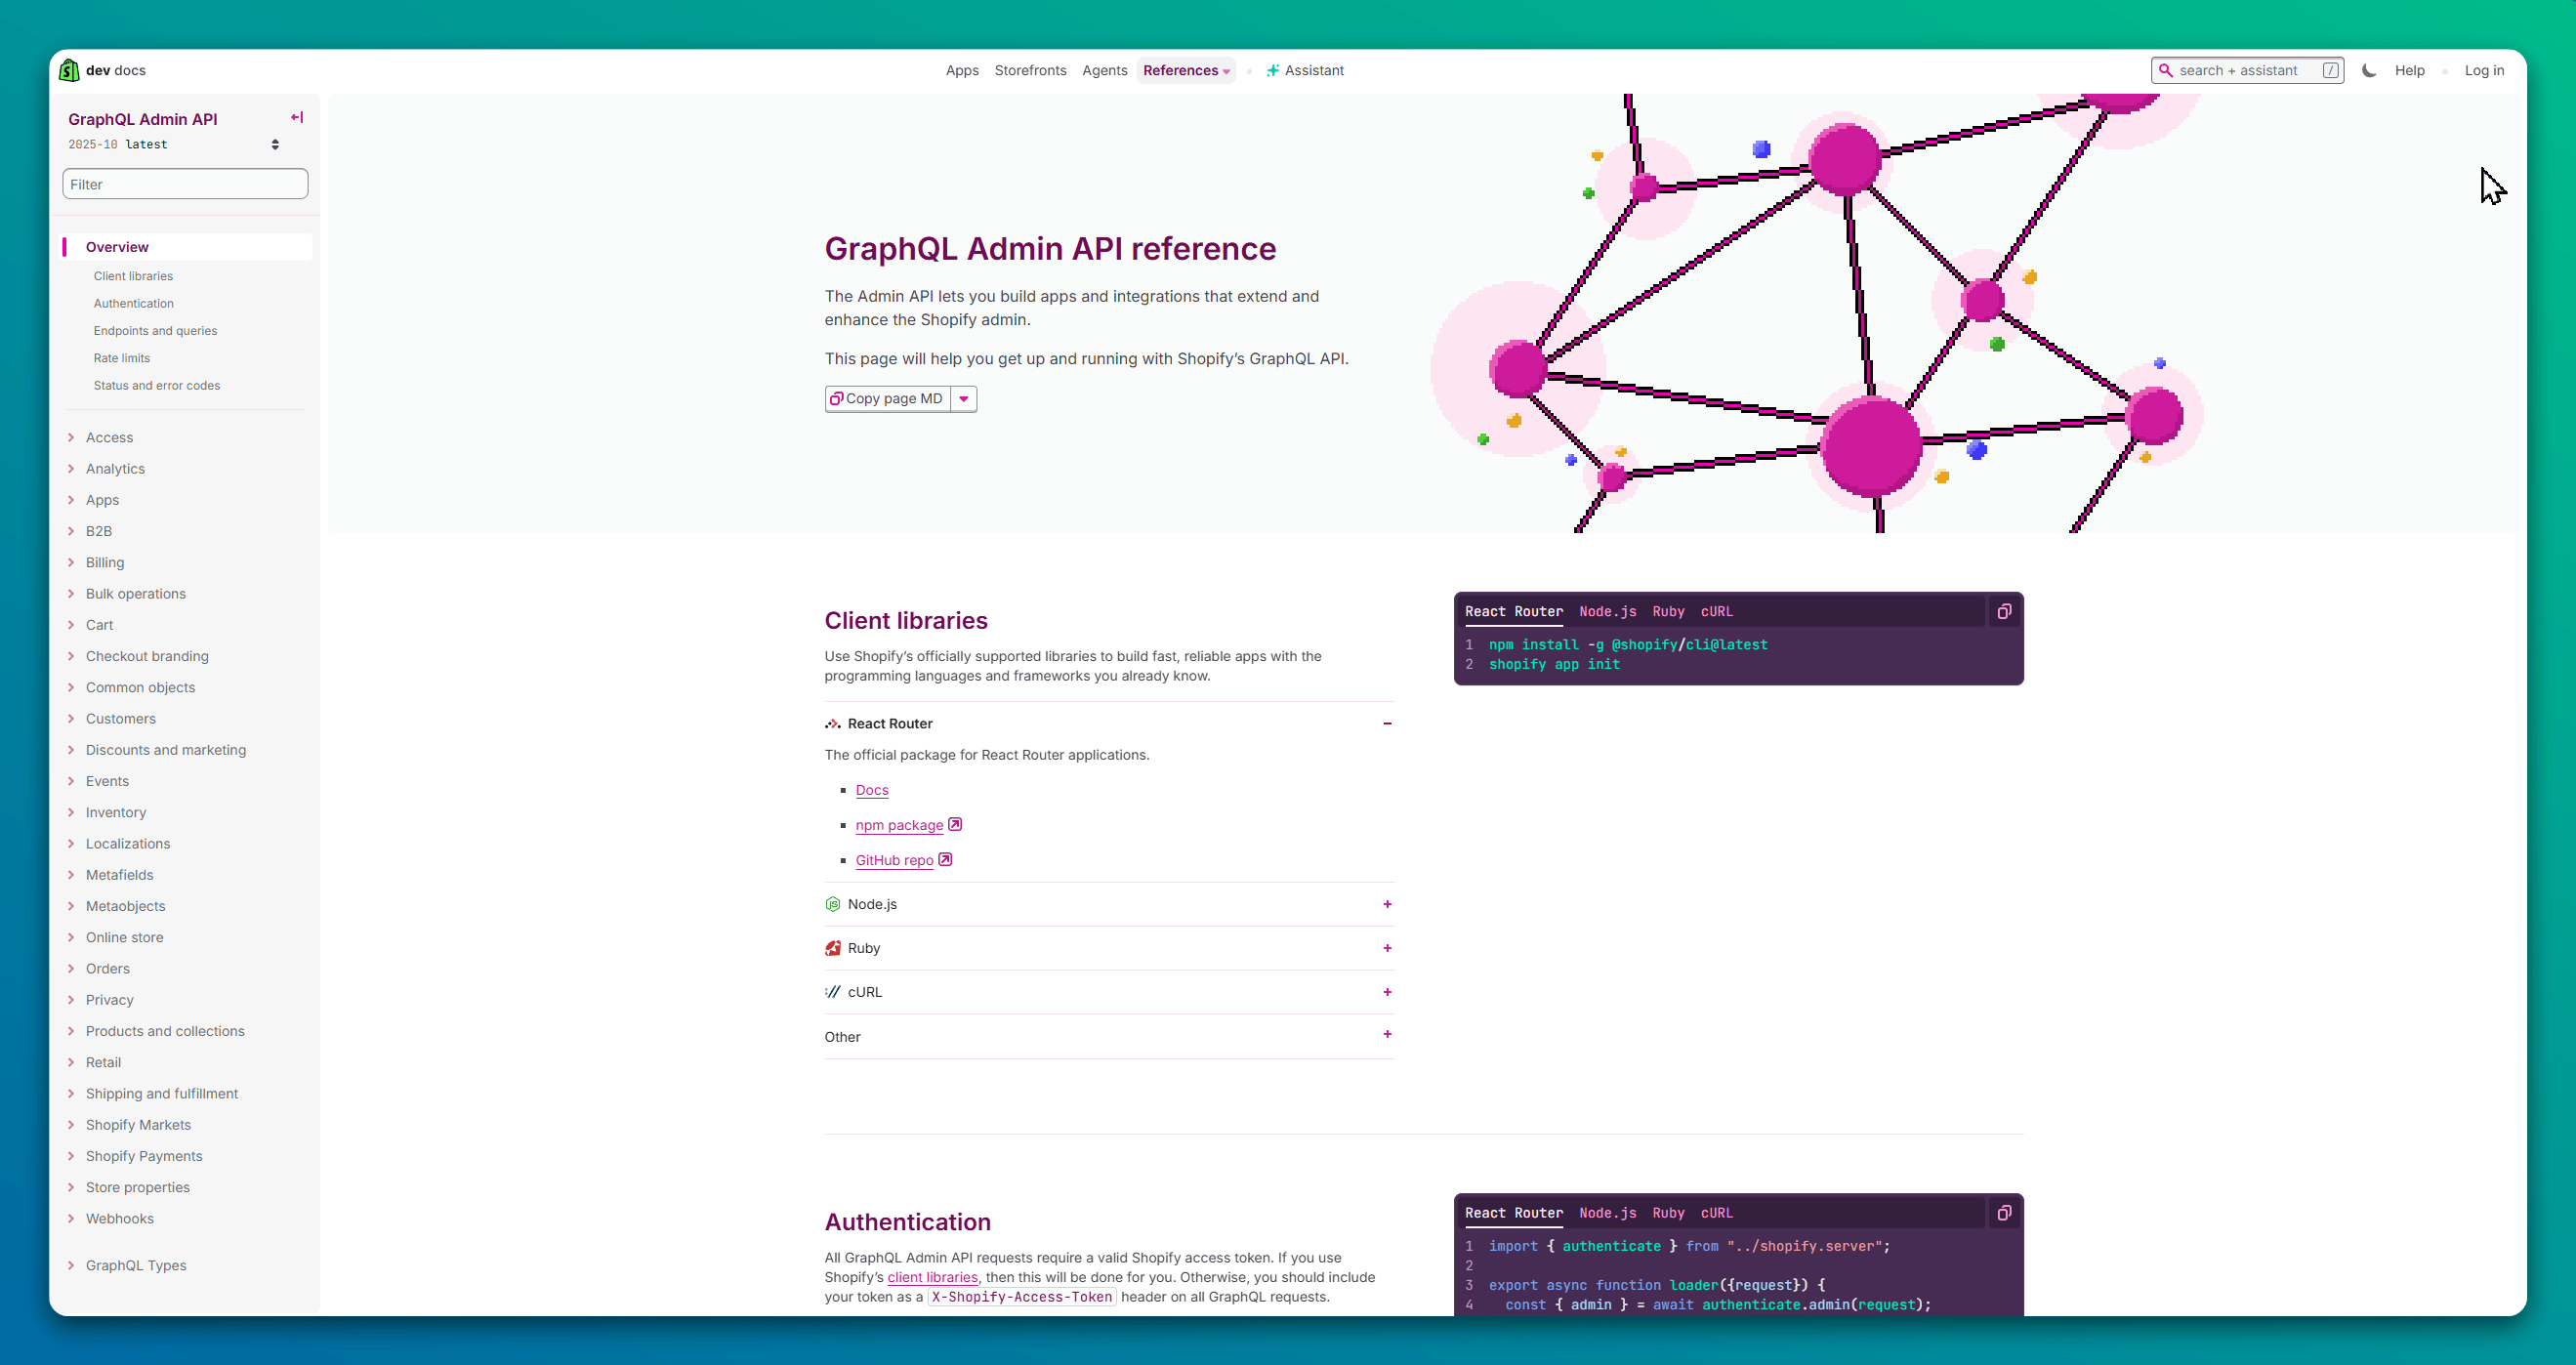
Next, you'll need to understand Shopify's API rules. For most business scenarios, you'll be using the Admin API (GraphQL).
Don't worry! You absolutely do not need to understand every single API rule from scratch. That's what AI is for!
With that, our setup is complete. Let's move on to configuring the node in N8N!
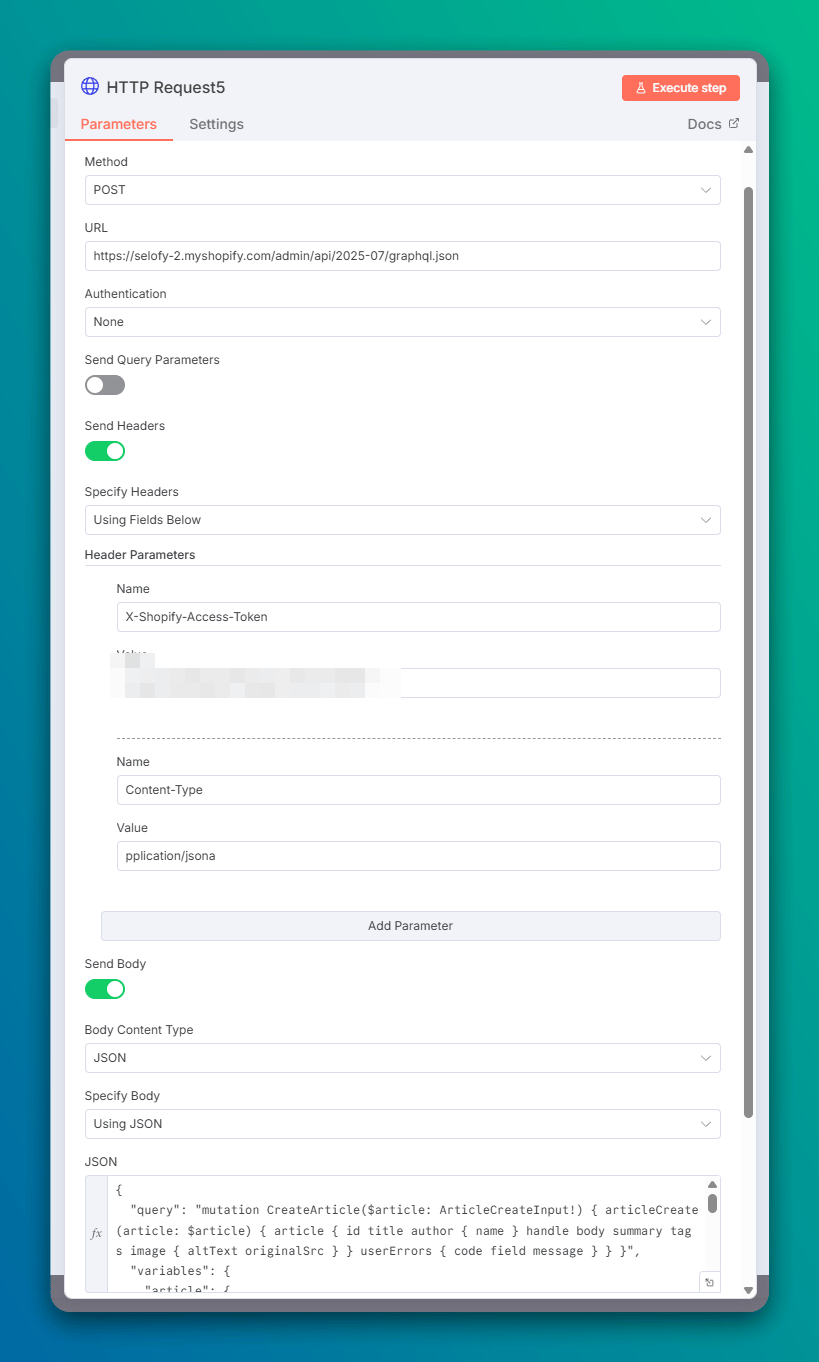
4. Hands-On: Configuring the Http Request Node
In your N8N workflow, find and drag in the Http Request node. Then, configure it as follows:
1. MethodSet this to POST.(POST is typically used to submit data to a server to create a new resource.)
2. URLEnter the URL in the format below, replacing the domain with your own store's handle.
https://your-store-handle.myshopify.com/admin/api/2025-10/graphql.json
💡 Tip: The API version 2025-10 can be adjusted as needed. It's best practice to use the latest stable version.
3. HeadersClick Add Header and add two key-value pairs:
X-Shopify-Access-Token: The value is your private access token you saved earlier, starting withshpat_.Content-Type: The value should be fixed asapplication/json.(This tells the server that we are sending data in JSON format.)
4. BodyThis is the most critical part. You need to structure the body according to your specific needs, following the format in Shopify's official API documentation. Most of the time, you can just ask an AI assistant for the code template you need.
For our scenario of "auto-publishing a blog post," the GraphQL JSON body would look something like this:
{
  "query": "mutation CreateArticle($article: ArticleCreateInput!) { articleCreate(article: $article) { article { id title author { name } handle body summary tags image { altText originalSrc } } userErrors { code field message } } }",
  "variables": {
    "article": {
      "blogId": "gid://shopify/Blog/101680775408",
      "title": {{ JSON.stringify($('AI Agent').item.json.output.blog_title) }},
      "author": {
        "name": "shopify"
      },
      "body": {{ JSON.stringify($('AI Agent').item.json.output.html_content.replace(/<script[^>]*>.*?<\/script>/gi, '')) }},
      "summary": {{ JSON.stringify($('AI Agent').item.json.output.summary) }},
      "image": {
        "altText": {{ JSON.stringify($('AI Agent').item.json.output.blog_title) }},
        "url": "https://image.selofy.com/cdn-cgi/image/format=webp,quality=80/pictures/youtube_thumbnail_20250917_0946.jpeg"
      },
      "isPublished": false
    }
  }
}
⚠️ Note: {{ $('AI Agent').item.json.output... }} is N8N's expression syntax. It's used to pull dynamic data from a previous node (in this case, a node named AI Agent).
5. Principle Breakdown
And that's it! Let's do a quick recap of how the Http Request node works:
- Method
POST: Defines our action as "sending something." - URL: Defines the "room number" of our target.
- Token in Header: Acts as the "key" to open the target's door.
Content-Type: application/json: Defines the "language" we're speaking (JSON).- JSON Body: This is the actual "business content" we want to deliver.
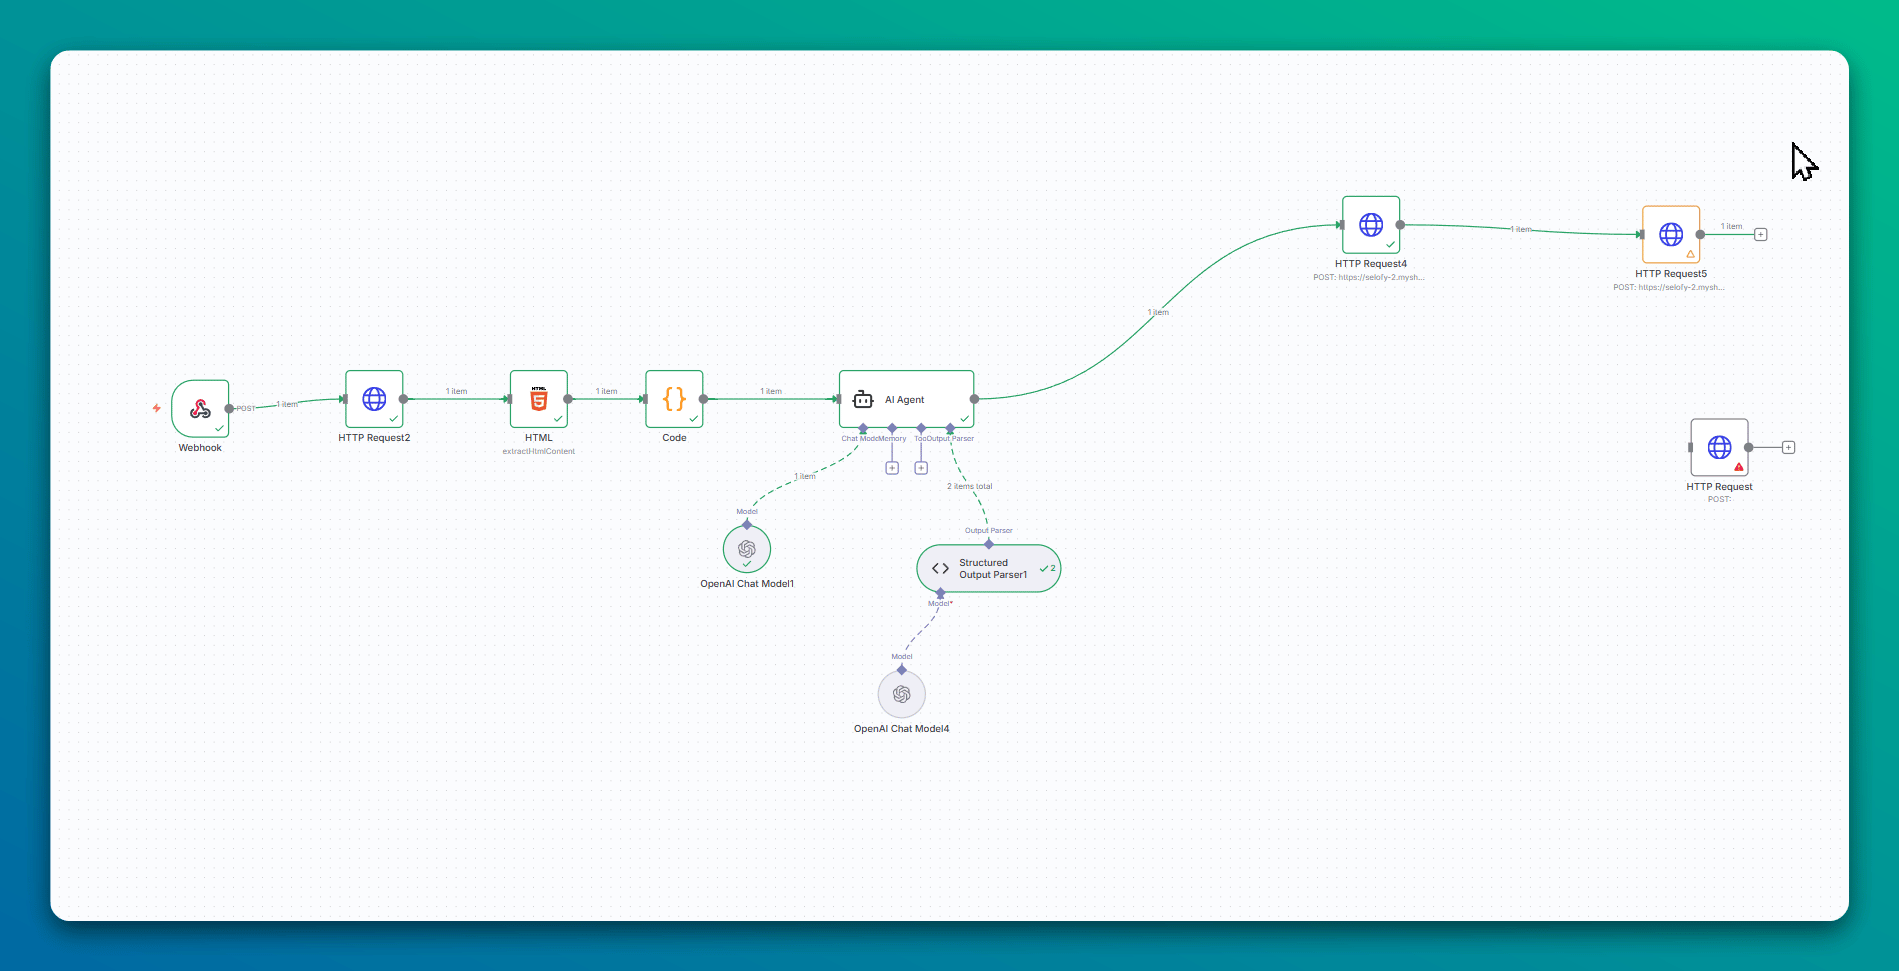
6. Full Workflow in Review
Finally, let's tie the entire automated process together:
- Receive Signal: The
Webhooknode receives a trigger containing a link to a WeChat article. - Process Content: The workflow automatically extracts and cleans the article content.
- AI Enhancement: The cleaned content is sent to AI, which processes it based on our instructions (e.g., pre-formatting, writing FAQs with JSON-LD schema, generating a summary, etc.).
- Auto-Publish: The
Http Requestnode takes the final result, packages it into an API request, and sends it directly to our Shopify store. The article is automatically created and saved.
A fully automated flow from content discovery to website publication is now complete!