How to Deploy a Shopify App to VPS Using Dokploy: Complete Guide
.jpg)
Watch Video Tutorial
Deploying a Shopify app to production can be challenging, especially when moving from local development to a live server. This guide walks you through deploying a Shopify Remix app to a VPS using Dokploy, a self-hosted deployment platform similar to Vercel or Heroku.
What You'll Learn
- Setting up Dokploy on your VPS
- Configuring PostgreSQL database
- Deploying your Shopify app
- Configuring environment variables
- Setting up GDPR compliance webhooks
- Connecting to Shopify Partner Dashboard
Prerequisites
Before starting, ensure you have:
- A VPS server (we used Hostinger VPS)
- A domain name pointing to your VPS (e.g.,
yourapp.selofy.com) - A Shopify Partner account with an app created
- Basic knowledge of Git and terminal commands
- Your Shopify app repository on GitHub
Step 1: Install Dokploy on Your VPS
Dokploy is an open-source Platform-as-a-Service that simplifies deployments. Install it with a single command:
curl -sSL https://dokploy.com/install.sh | sh
The installation takes 3-5 minutes. Once complete:
- Access Dokploy admin panel at
http://your-vps-ip:3000 - Complete the initial setup wizard
- Create an admin account
Step 2: Create a PostgreSQL Database
Shopify apps need a database to store session data and app-specific information. (Or you cansuse supabase)
In Dokploy Dashboard:
- Navigate to Databases section
- Click Create Database
- Select PostgreSQL
- Configure settings:
- Database Name:
alttext - Username:
postgres - Password: Create a strong password
- Port:
5432(default)
- Database Name:
- Click Create
Dokploy will provision the database and provide a connection string:
postgresql://postgres:your_password@database-internal-hostname:5432/alttext
Important: Save this connection string - you'll need it for environment variables.
Step 3: Configure Your Shopify App Repository
Before deploying, ensure your app repository has the correct configuration files. (I use remix as an example)
Update package.json
Add these scripts to your package.json:
{
  "scripts": {
    "build": "remix vite:build",
    "start": "remix-serve ./build/server/index.js",
    "dev": "shopify app dev"
  }
}
The start script runs your production server, while build creates the production bundle.
Configure Prisma for PostgreSQL
Update your prisma/schema.prisma file to use PostgreSQL:
datasource db {
  provider = "postgresql"
  url      = env("DATABASE_URL")
}

generator client {
  provider = "prisma-client-js"
}
Update Migration Lock
Change prisma/migrations/migration_lock.toml to PostgreSQL:
provider = "postgresql"
If you previously used SQLite, you'll need to regenerate migrations:
# Delete old migrations (backup first!)
rm -rf prisma/migrations# Create new migration for PostgreSQL
npx prisma migrate dev --name init
Configure Docker Ignore
Create or update .dockerignore to exclude unnecessary files:
node_modules
.env
.git
.cache
build
dist
*.log
.DS_Store
Critical: Exclude .env to prevent leaking secrets. Environment variables should be set in Dokploy, not bundled in the image.
Commit and Push Changes
git add .
git commit -m "Configure for production deployment"
git push origin main
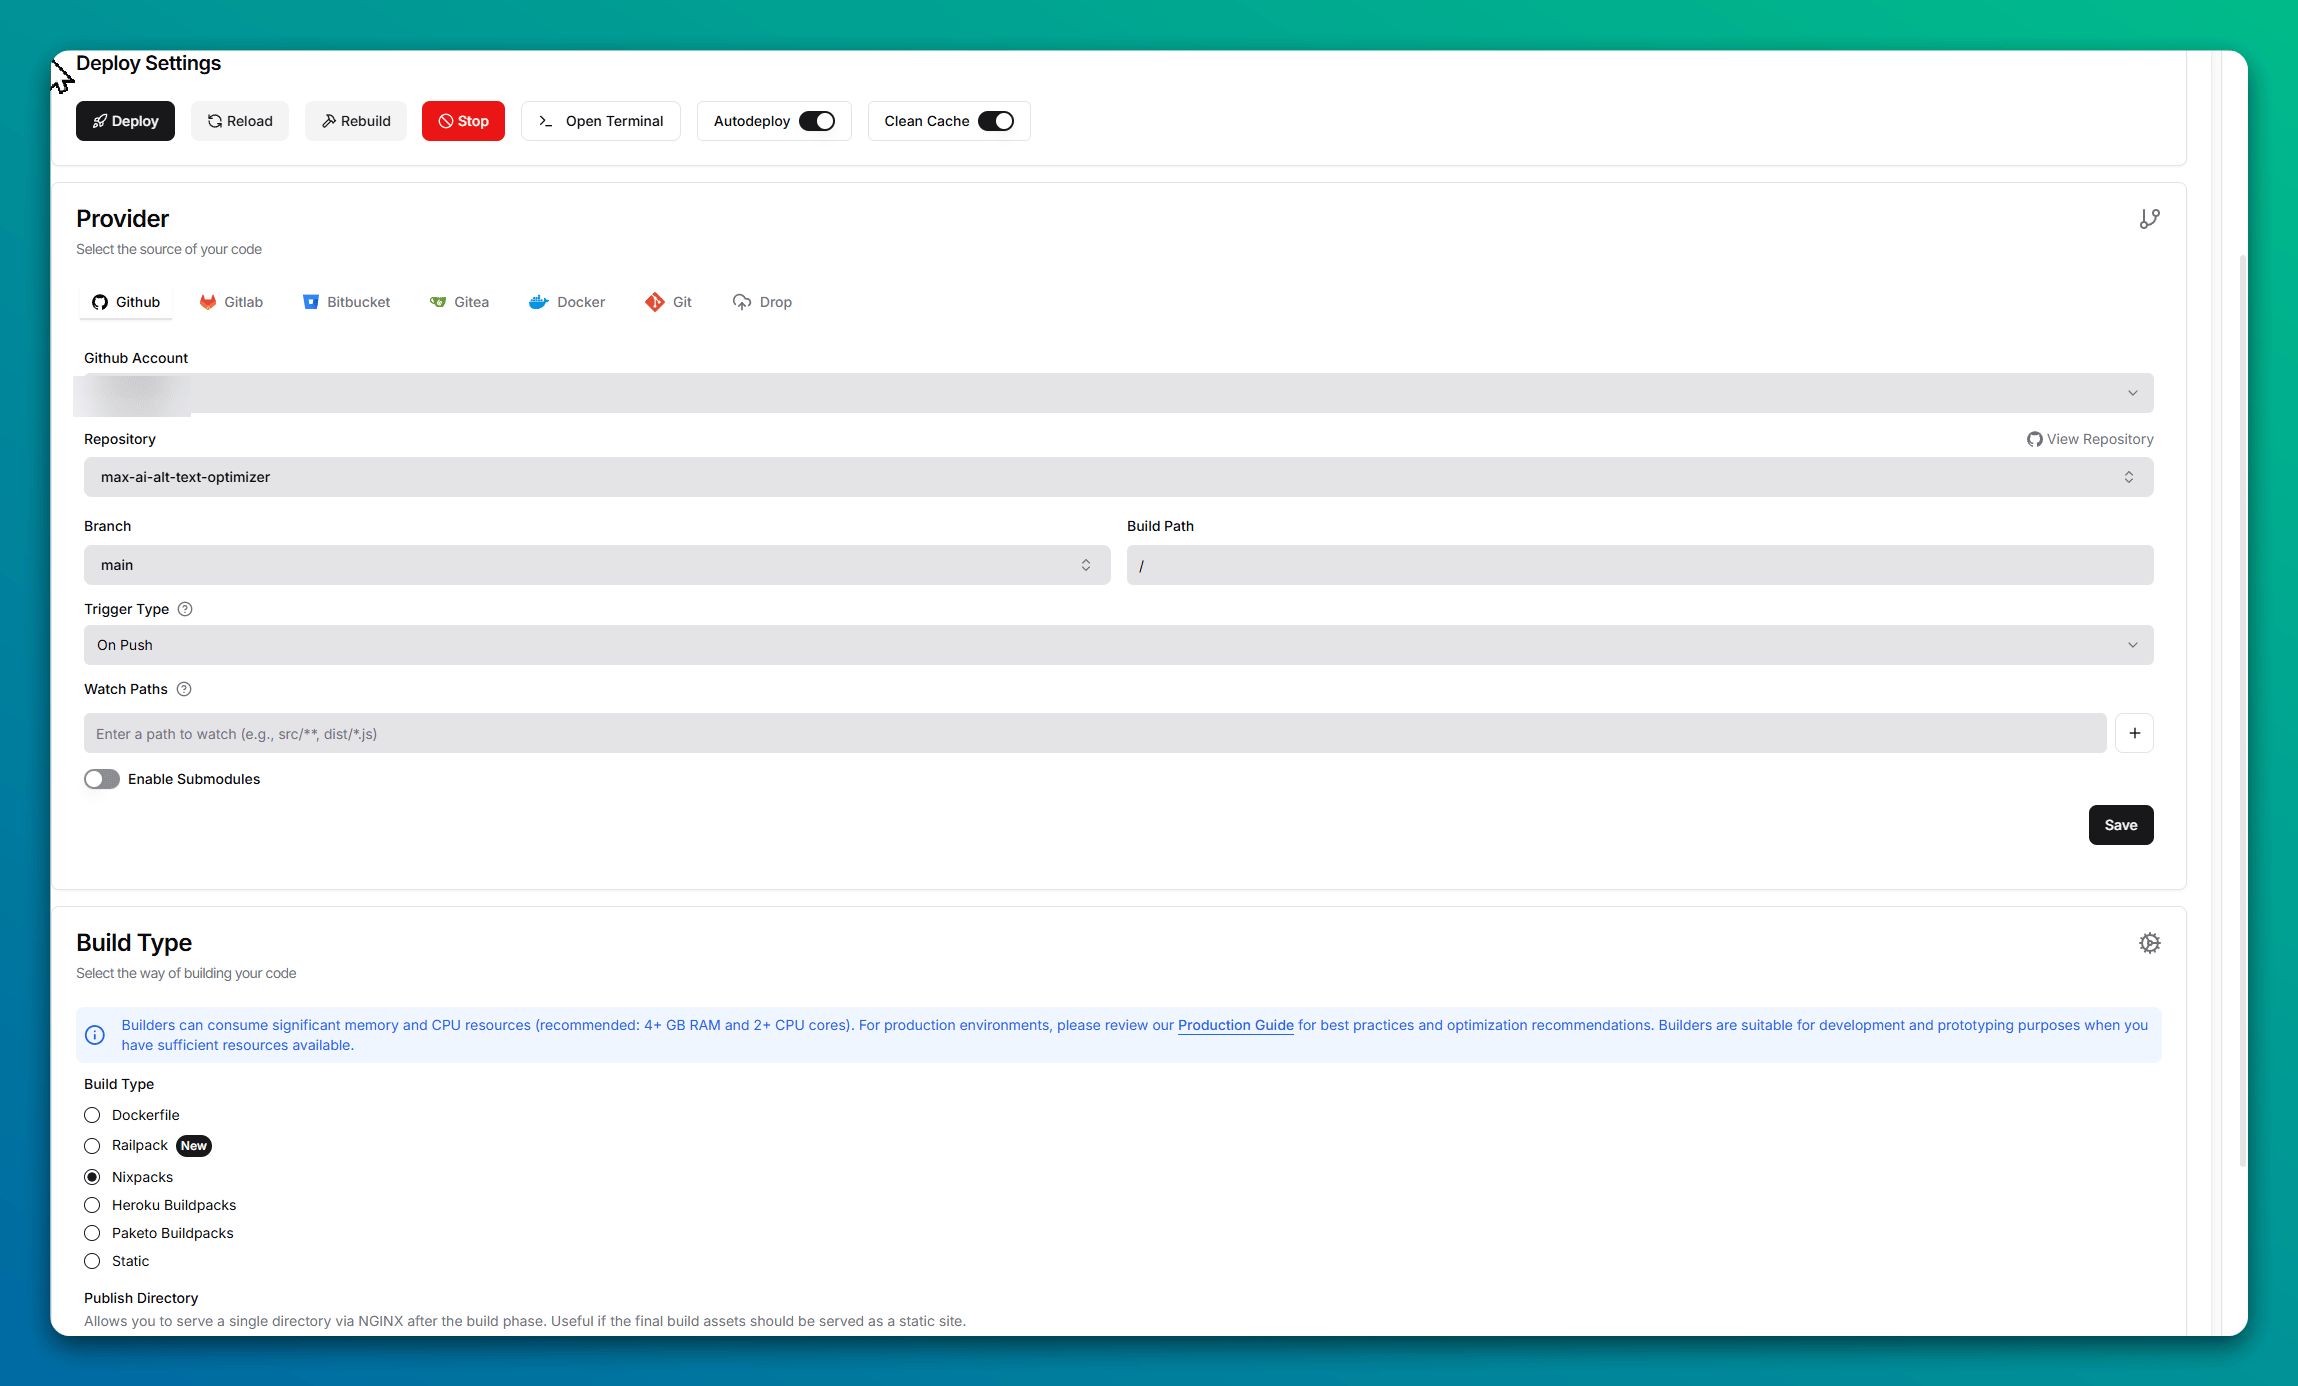
Step 4: Create Application in Dokploy
Now deploy your app to Dokploy:
- Go to Applications in Dokploy
- Click Create Application
- Select GitHub as source
- Authorize Dokploy to access your repository
- Select your Shopify app repository
- Configure build settings:
- Branch:
main(or your production branch) - Build Pack:
nixpacks(auto-detects Node.js) - Port:
3000
- Branch:
Step 5: Configure Environment Variables
This is the most critical step. Your app needs specific environment variables to function.
In Dokploy Application Settings → Environment Variables:
#Nixpacks build commands
NIXPACKS_INSTALL_CMD=pnpm install --frozen-lockfile --ignore-scripts
NIXPACKS_BUILD_CMD=pnpm run build
NIXPACKS_START_CMD=pnpm run start
#Network Configuration
HOST=0.0.0.0
PORT=3000
#Shopify Configuration
#Get these values from your Shopify Partner Dashboard → Apps → [Your App]:
SHOPIFY_API_KEY=your_client_id_here
SHOPIFY_API_SECRET=your_api_secret_here
SHOPIFY_APP_URL=https://your-domain.com
#Scopes
#Your app needs specific API permissions:
SCOPES=read_products,write_products,read_files,write_files,read_content,write_content
#Database Configuration
#Important: Replace your-db-hostname with the internal database hostname provided by Dokploy (usually something like shopify-app-db-xxxxx).
DATABASE_URL=postgresql://postgres:your_password@your-db-hostname:5432/alttext
#Optional Session Security
#SHOPIFY_SESSION_SECRET=your_secure_random_string_here
#Production Environment
NODE_ENV=production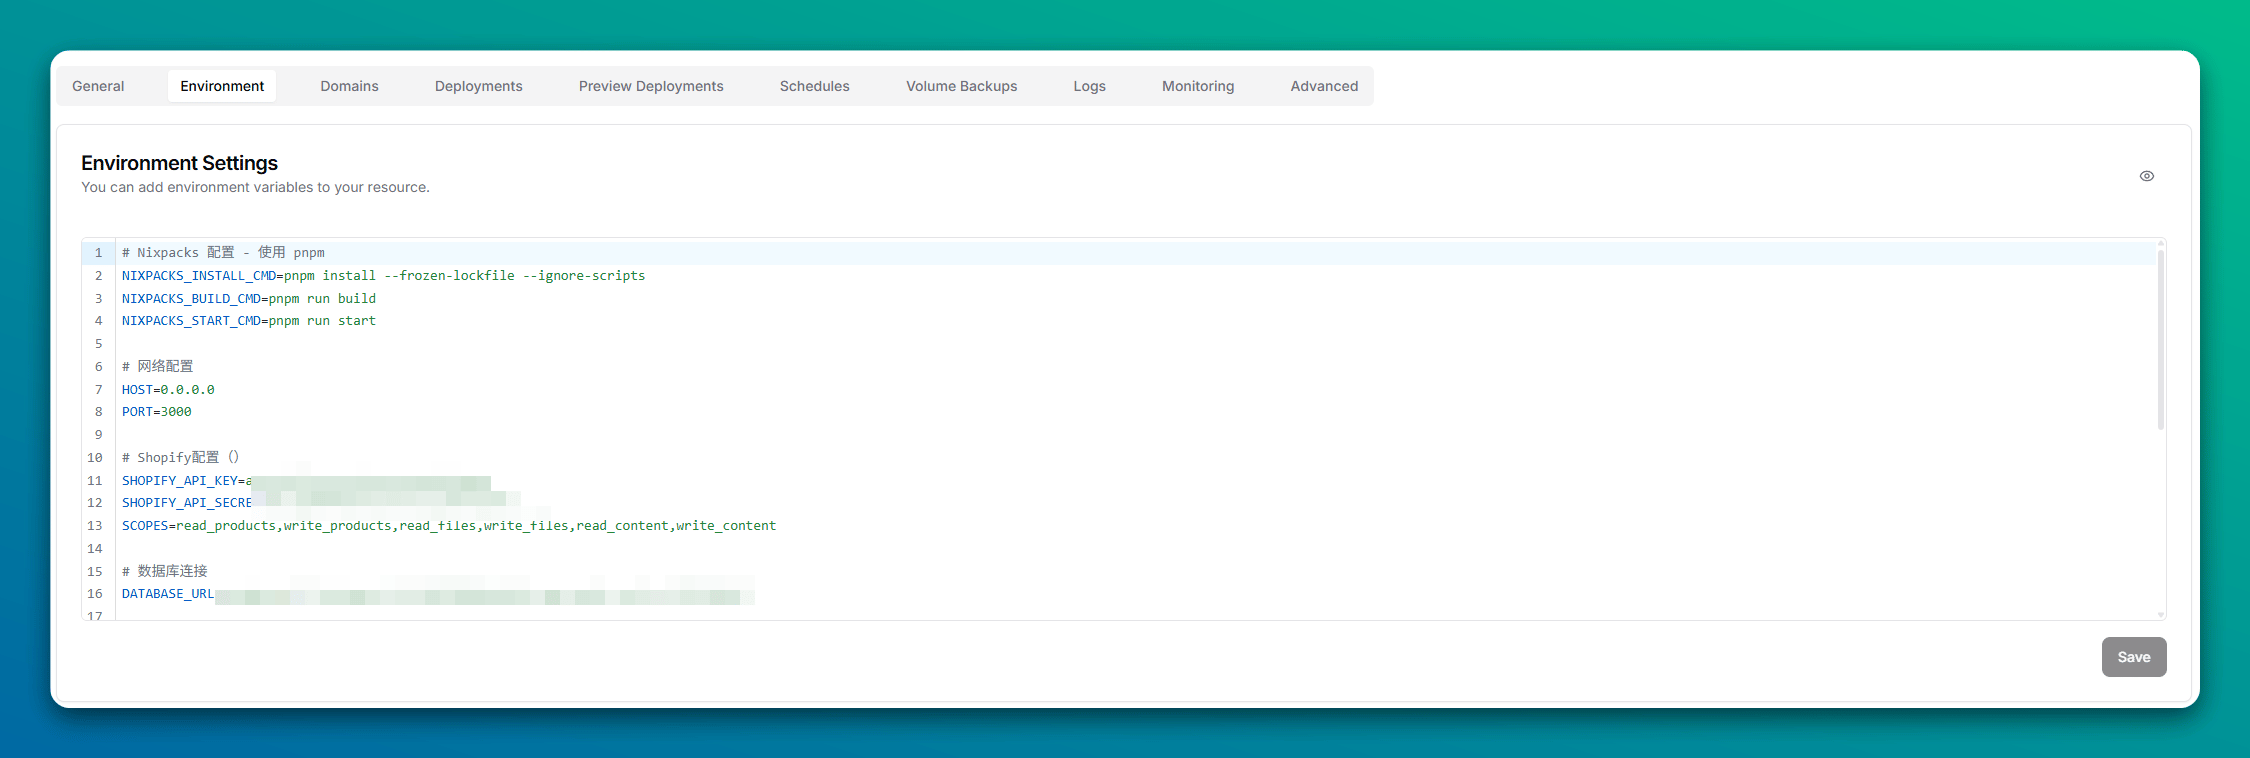
Step 6: Deploy Your Application
With all environment variables configured:
- Click Deploy in Dokploy
- Monitor build logs in real-time
- Wait for deployment to complete (3-5 minutes)
Common Build Issues:
Issue: prisma:generate fails Solution: Add --ignore-scripts to install command (already included above)
Issue: Database connection error Solution: Verify DATABASE_URL format and database hostname
Issue: Port binding error Solution: Ensure HOST=0.0.0.0 (not localhost)
Step 7: Run Database Migrations
After successful deployment, your database needs the schema:
- Go to Dokploy Application → Terminal
- Open a terminal session in your running container
- Run Prisma migrations:
npx prisma migrate deploy
This creates all necessary database tables.
Step 8: Configure Domain and SSL
Add Domain in Dokploy
- Navigate to Application → Domains
- Click Add Domain
- Enter your domain:
alttext.selofy.com - Enable SSL/TLS (Let's Encrypt automatic)
- Save and wait for SSL provisioning (1-2 minutes)
Verify DNS Configuration
Ensure your domain's DNS A record points to your VPS IP:
Type: A
Name: alttext (or subdomain)
Value: your.vps.ip.address
TTL: 3600
Test SSL certificate:
curl -I https://alttext.selofy.com
You should see HTTP/2 200 with valid SSL.
Step 9: Configure Shopify Partner Dashboard
Now connect your deployed app to Shopify:
Update App URL
- Go to Shopify Partner Dashboard
- Select your app
- Navigate to Configuration → App URL
- Update to:
https://alttext.selofy.com - Save changes
Configure Redirect URLs
Still in Configuration → URLs:
Add these redirect URLs:
https://alttext.selofy.com/auth/callback
https://alttext.selofy.com/auth/shopify/callback
These handle OAuth authentication after merchants install your app.
Configure Access Scopes
In Configuration → Access Scopes:
Add the same scopes from your environment variables:
read_productswrite_productsread_fileswrite_filesread_contentwrite_content
Click Save.
Step 10: Set Up GDPR Compliance Webhooks
All Shopify apps must implement three GDPR compliance webhooks.
Create Webhook Handler Files
In your app repository, create these files:
app/routes/webhooks.customers.data_request.tsx
import type { ActionFunctionArgs } from "@remix-run/node";import { authenticate } from "../shopify.server";export const action = async ({ request }: ActionFunctionArgs) => {
const { shop, payload } = await authenticate.webhook(request);
const customerId = payload.customer?.id;
console.log(`Customer data request: ${shop}, customer: ${customerId}`);
// TODO: Implement data retrieval and send to customer
// Collect all customer data from your database
// Format according to GDPR requirements
// Send via email or make available for download
return new Response();
};
app/routes/webhooks.customers.redact.tsx
import type { ActionFunctionArgs } from "@remix-run/node";import { authenticate } from "../shopify.server";import db from "../db.server";export const action = async ({ request }: ActionFunctionArgs) => {
const { shop, payload } = await authenticate.webhook(request);
const customerId = payload.customer?.id;
console.log(`Customer redaction request: ${shop}, customer: ${customerId}`);
// Delete all customer-specific data from your database
// Example (adjust based on your schema):
// await db.customerData.deleteMany({
// where: { customerId: customerId }
// });
return new Response();
};
app/routes/webhooks.shop.redact.tsx
import type { ActionFunctionArgs } from "@remix-run/node";import { authenticate } from "../shopify.server";import db from "../db.server";export const action = async ({ request }: ActionFunctionArgs) => {
const { shop, payload } = await authenticate.webhook(request);
const shopDomain = payload.shop_domain || shop;
console.log(`Shop redaction request: ${shopDomain}`);
try {
// Delete ALL shop data from your database
await db.session.deleteMany({ where: { shop: shopDomain } });
await db.userSettings.deleteMany({ where: { shopDomain } });
// Add all your other tables here
    console.log(`Successfully redacted all data for: ${shopDomain}`);
  }
catch (error) {
console.error(`Error redacting shop data:`, error);
}
return new Response();
};
Configure Webhooks in shopify.app.toml
Update your shopify.app.toml configuration file:
client_id = "your_client_id"
name = "Your App Name"
application_url = "https://alttext.selofy.com"
embedded = true

[build]
automatically_update_urls_on_dev = true

[webhooks]
api_version = "2025-07"

[[webhooks.subscriptions]]
topics = [ "app/uninstalled" ]
uri = "/webhooks/app/uninstalled"

[[webhooks.subscriptions]]
compliance_topics = [ "customers/data_request" ]
uri = "/webhooks/customers/data_request"

[[webhooks.subscriptions]]
compliance_topics = [ "customers/redact" ]
uri = "/webhooks/customers/redact"

[[webhooks.subscriptions]]
compliance_topics = [ "shop/redact" ]
uri = "/webhooks/shop/redact"

[access_scopes]
scopes = "read_products,write_products,read_content,write_content,read_files,write_files"

[auth]
redirect_urls = [
  "https://alttext.selofy.com/auth/callback",
  "https://alttext.selofy.com/auth/shopify/callback"
]
Critical: GDPR webhooks must use compliance_topics, not regular topics.
Deploy Webhook Configuration
Commit your changes:
git add app/routes/webhooks.* shopify.app.toml
git commit -m "Add GDPR compliance webhooks"
git push origin main
Redeploy in Dokploy (or wait for auto-deploy if configured).
Register Webhooks with Shopify
Use Shopify CLI to deploy the webhook configuration:
shopify app deploy --force
This registers all webhooks defined in shopify.app.toml with Shopify.
Verify in Partner Dashboard:
- Go to Configuration → Webhooks
- You should see all three GDPR compliance webhooks listed
- Each shows the correct URI and API version
Step 11: Test Your Deployment
Test Basic App Access
Visit your app URL:
https://alttext.selofy.com
You should see a Shopify login page asking for a store domain.
Install on Development Store
- Enter your development store domain (e.g.,
mystore.myshopify.com) - Click "Log in"
- Shopify redirects to OAuth authorization page
- Click "Install app"
- App should load successfully in Shopify Admin
Verify Database Connection
Check your app's functionality:
- Settings save correctly
- Data persists after page refresh
- No console errors about database connection
Test Webhooks
- In Shopify Admin, go to Settings → Apps and sales channels
- Find your app and click Uninstall (don't worry, you can reinstall)
- Check your application logs in Dokploy
- You should see the
app/uninstalledwebhook logged
Reinstall the app to continue testing.
Step 12: Monitor and Maintain
Application Logs
Monitor your app in Dokploy:
- Go to Application → Logs
- View real-time application output
- Filter by error/warning levels
Database Backups
Set up automatic backups in Dokploy:
- Navigate to Databases → Your Database
- Go to Backups tab
- Configure automatic backup schedule (daily recommended)
- Test restore process
Update Deployments
When pushing code updates:
Automatic Deployment (recommended):
- Enable auto-deploy in Dokploy application settings
- Push to your main branch
- Dokploy automatically rebuilds and deploys
Manual Deployment:
- Push code to GitHub
- Go to Dokploy application
- Click Deploy button
Zero-Downtime Deployments
Dokploy supports rolling deployments:
- New version builds while old version runs
- Traffic switches to new version when ready
- Old version terminates after health check passes
Production Best Practices
1. Environment Variables Security
- Never commit
.envfiles to Git - Use Dokploy's environment variable management
- Rotate API secrets regularly
- Use different secrets for development and production
2. Database Management
- Enable automatic backups
- Test restore process regularly
- Use connection pooling for better performance
- Monitor database size and query performance
3. Monitoring and Logging
- Set up error tracking (e.g., Sentry)
- Monitor application performance
- Set up alerts for critical errors
- Regularly review application logs
4. Scaling Considerations
- Start with a single container
- Scale horizontally when needed (Dokploy supports multiple instances)
- Use Redis for session storage if scaling beyond one instance
- Monitor CPU and memory usage
5. Updates and Maintenance
- Test updates on staging environment first
- Schedule maintenance during low-traffic periods
- Keep dependencies updated
- Follow Shopify API versioning guidelines
Cost Breakdown
Approximate monthly costs for this setup:
- VPS Server: $10-50/month (depending on specs)
- Domain Name: $10-15/year
- Dokploy: Free (self-hosted)
- PostgreSQL: Included with Dokploy
- SSL Certificate: Free (Let's Encrypt)
Total: ~$15-55/month
Compare to alternatives:
- Heroku: ~$50-100/month (with database)
- Fly.io: ~$20-80/month
- AWS/GCP: ~$30-150/month
Conclusion
You now have a production-ready Shopify app deployed on your VPS using Dokploy. This setup provides:
✅ Secure HTTPS connection with automatic SSL ✅ PostgreSQL database with automated backups ✅ GDPR compliance webhooks ✅ OAuth authentication ✅ Environment variable management ✅ Easy deployment and updates ✅ Application monitoring and logs
The self-hosted approach with Dokploy gives you full control, lower costs, and eliminates vendor lock-in while maintaining ease of use similar to Heroku or Vercel.
Next Steps
- Set up monitoring: Integrate error tracking and performance monitoring
- Add CI/CD: Automate testing before deployment
- Configure staging environment: Test updates before production
- Optimize performance: Add caching, CDN for static assets
- Submit to Shopify App Store: Follow Shopify's listing guidelines